
Using rounded corners in photoshop is a breeze with the new rounded corner tool. Before the rounded corner tool the only way to round images was to use either vector paths imported from illustrator or make a rounded selection path from artwork imported from other applications. The problem with this technique was that it left little room for minor adjustments since the rounded corner image or shape had to be created in a different application. To get it right you would need to import the image into illustrator, adjust the rounded corner shape to the right size then bring that shape back into photoshop. This complicated things and made customization a pain.
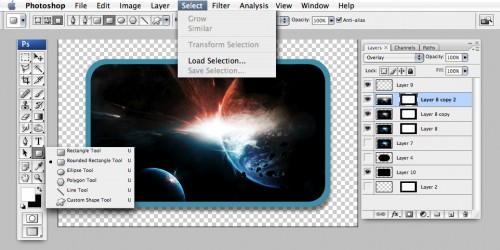
In photoshop CS the tool pallette now includes a shape tool. Select this tool and hold down.....a series of shape options including the Ellipse, Polygon, Line, custom shape and the rounded Rectangle Tool. Each of the shape tool options has its own set of properties you can customize.
heres a simple walkthrough of how you can add rounded corners to an image:
- First open an image file
- Now add a new layer in the layers panel
- On this layer using the shape tool draw a Rounded rectangle. Notice that once this tool is selected and the layer is active you can adjust the radius of the corner.....
- Using the Magic Wand or Direct Selection Tool select the rounded shape
- Choose the select drop down and save your selection
- Now in the layers panel chose your image and cut it from the canvas onto your clipboard
- Load the selection shape using select>load selection.
- You should now see a dotted "marquee" outline of your shape / saved path.
- With the dotted "marquee" path still showing chose Edit > paste Into. This will p[aste your image inside the selection shape creating a mask.
- There you go - you should now see your image masked by the shape of your saved path with rounded corners.
- Use the layers panel at any time to make minor adjustments, add shadows, glows or whatever you chose. You can also scale or fine tune the masked image untill its positioned perfectly.
- Export the file as a transparent background png to maintain your transparent background. this way you can overlay the file onto other images or designs seemlessly.
In photoshop theres so many tools and techniques - the possibilities are endless. A good approach is keep an open mind when photoshopping, since many paths can take you to the same goal. Dont be affraid of the tools. Drag layers around reorganize them adjust their transparency. experiment with the tools provided. Often your best designs will reveal themselves to you as a result of a layer interacting with another layer in a particular way that looks good. You may see things that improve the design or detract from it. If you like the way something looks duplicate it onto its own layer. You can then turn that layer on and off or toggle between the two and compare. Doing this allows your designs to evolve in ways that often exceed your initial expectations. With tools like Motion Blur or Zoom Blur combined with all the different layering possibilities...... there are no limits to what you can create using photoshop.
try this site for more inspiration and maneuvers - http://psd.tutsplus.com/
Tags: General

THAT Agency Partners with Spectrum Exteriors for Colorado Hail Recovery

THAT Agency Partners with Tech Service Today to Boost IT Digital Presence

Email Marketing Tips: 7 Unique Strategies Backed by Research

SEO for Dentists: How to Attract More Patients in 2025
THAT Agency Launches New Website for Pacific Rim & Co.

2000 Palm Beach Lakes Blvd
Suite 601
West Palm Beach, FL 33409
P: 561.832.6262
F: 561.832.7707


